How to turn an SOP into a video
You do not have to learn a format. Paste the procedure in whatever shape you already have it, your own wording, your own headings, your own house style, and the engine rewrites it into the shape it draws from: one scene at a time, each with a caption, a spoken line and an illustration brief.
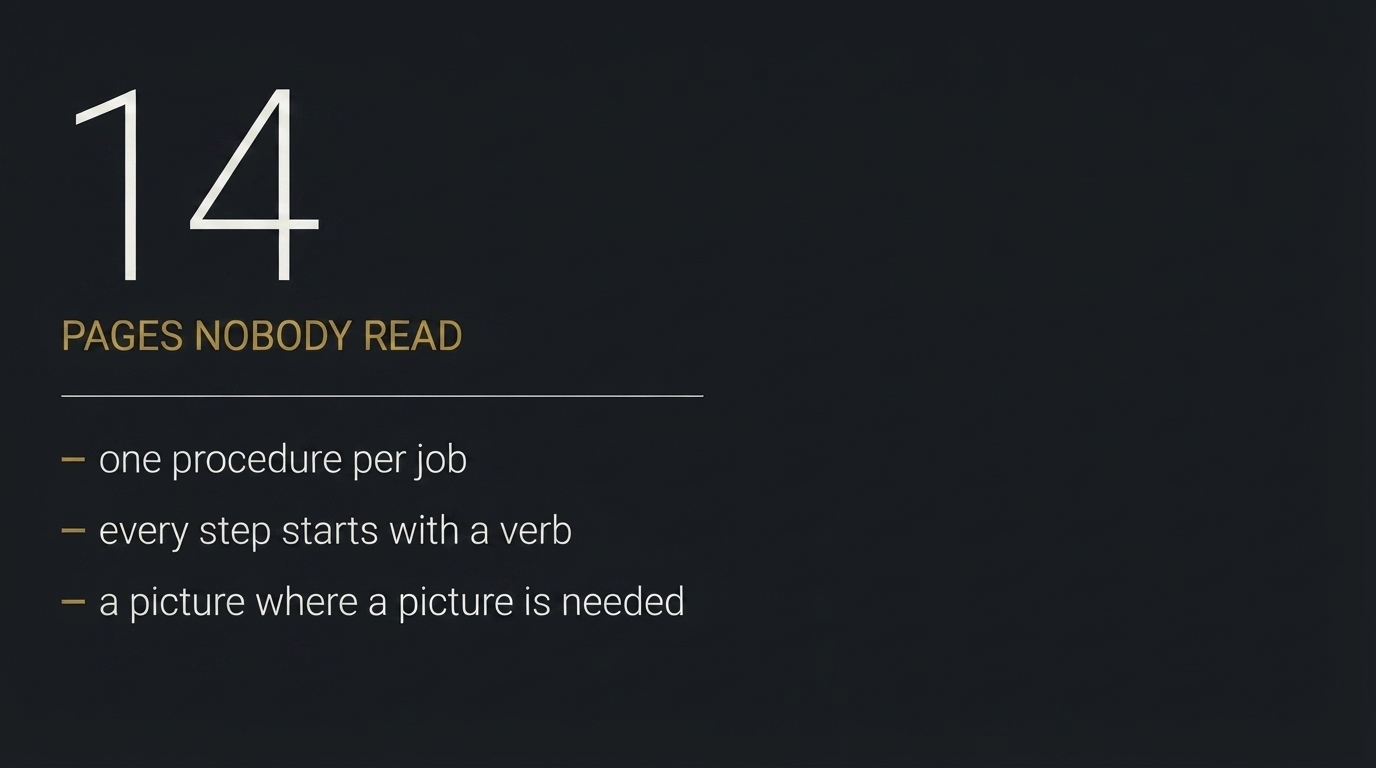
Below is one real job in full, in the order it happened: the script that was pasted in, the style it was drawn in, the six frames that came back, and the finished video at the end. One thing decides how close the result lands: how precisely each frame is described.
Why the written version stops working at the door
Most procedures are written to satisfy an audit. Eight pages of dense prose, filed in a binder or a wiki, read once at induction.
The work they describe happens standing up. An operator on a receiving dock, with a truck idling behind them, has time to check three things and write down one. They do not have time to find page four.
A video only fixes that if it keeps the same constraint: one physical step per scene, and the rule printed inside the frame where somebody can read it with the sound off.
Before anything: the procedure as a list of steps
Before any of it, the procedure has to exist as a list of steps, one action per line, said the way you would say it to a new hire. That list is the only real work, and you probably already have it written somewhere.
For this one, six lines:
- What a signature actually means
- Match the paperwork to the load before unloading
- Count and inspect while the driver is still here
- Write the discrepancy on the note and photograph it
- Sign, then scan the pallet to its location
- The rule: not counted, not signed
Six steps became six scenes. That is the only planning decision that matters: one physical beat per scene, never two.
Detail is the whole trick
The more precisely a frame is described, the better the video comes back. There is no other lever. The engine draws each frame on its own, from nothing but the words in that scene, so anything left vague is invented afresh every time, and invented differently.
Write the object down to its shape, its position and its size in the frame, then copy that sentence into every scene the object appears in, word for word. Not a paraphrase, the same sentence. In the script below, the operator, the pallet and the clipboard each carry one fixed description, and they stay the same objects from scene one to scene six. A version of the same video that described the paper loosely, "a sheet of paper, seen straight on", came back with a different notepad in every frame: a spiral in one, rings in the next, a clipboard in the third.
Two habits follow from that, and they cost nothing:
- Write the printed strings yourself, exactly. Every string given in full came back character for character. Every string merely described came back invented.
- End each frame with what is not in it. "No people in this frame. Nothing else in the frame." The engine fills empty space with props otherwise, and props are what make a frame look generated.
Step 1. We took the procedure and passed in this script
Whatever goes in, the engine converts it into scenes, and every scene carries the same three things: what is read on screen, what is heard, and what is drawn. Timings are worked out from the spoken lines, which is why they appear beside each scene.
[voice] is written for the ear. Twenty to thirty-five words, which is about ten seconds.
[caption] is the line a silent viewer reads. It states the rule, not the topic.
[drawing] is what is in the frame: which objects, where they stand, how big, and the printed strings word for word.
Here is the whole script for the video above, exactly as it stands in the job, including the parts that misfired. It is written with tags because we were testing how closely the engine follows instructions; plain prose works just as well, since the rewriting step is the same either way.
[title] Standard Operating Procedure: Receiving & Freight Inspection

[scene 1 | 0:00]
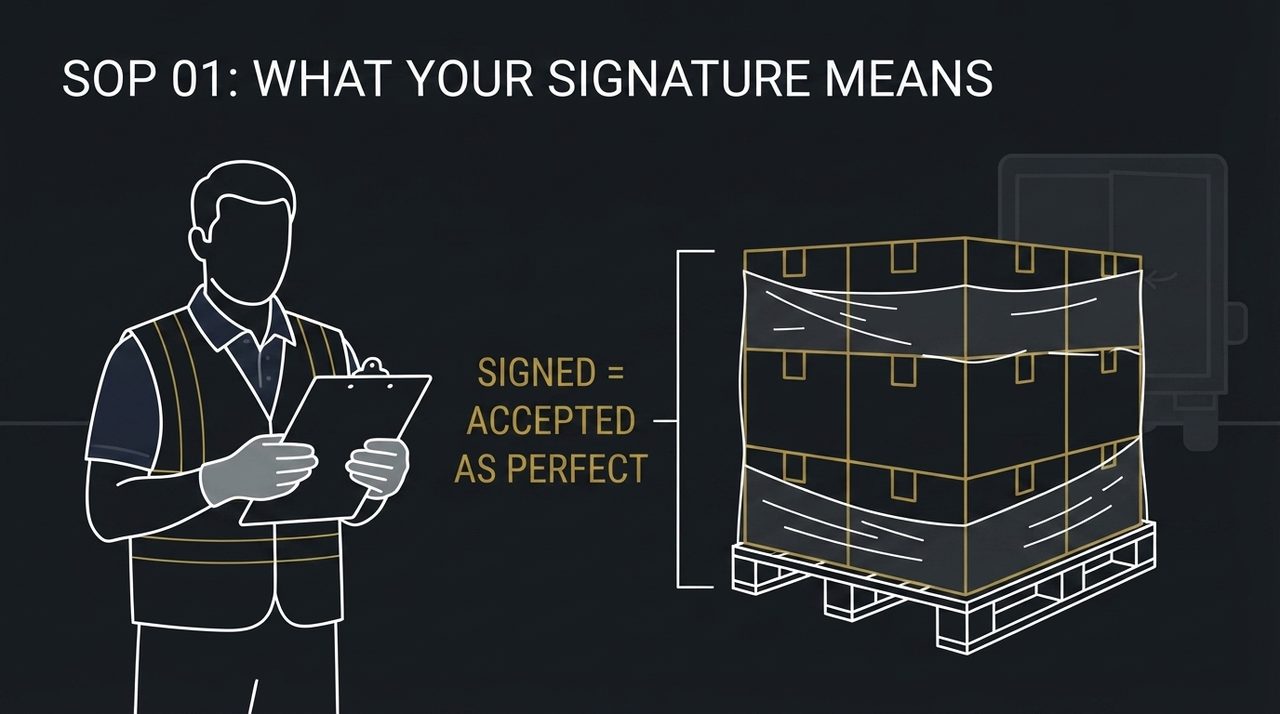
[caption] SOP 01: WHAT YOUR SIGNATURE MEANS
[voice] The moment you sign for freight, every missing carton and hidden dent becomes company loss. Once the driver leaves the dock, you own the damage.
[drawing] HEADER: Top-center, standard 5% canvas height, bold uppercase sans-serif: "SOP 01: WHAT YOUR SIGNATURE MEANS". SCENE COMPOSITION: Wide corporate framing below the header. On the right, a wooden warehouse pallet wrapped in clear film, holding exactly six stacked cartons. On the left, an operator in a navy work shirt, high-visibility vest, and gray protective gloves, holding an industrial clipboard at chest height. Connecting the two: a bold technical bracket with high-contrast text: SIGNED = ACCEPTED AS PERFECT. In the far background, the faint silhouette of a delivery truck door closing. Clean lines, zero visual clutter.

[scene 2 | 0:10]
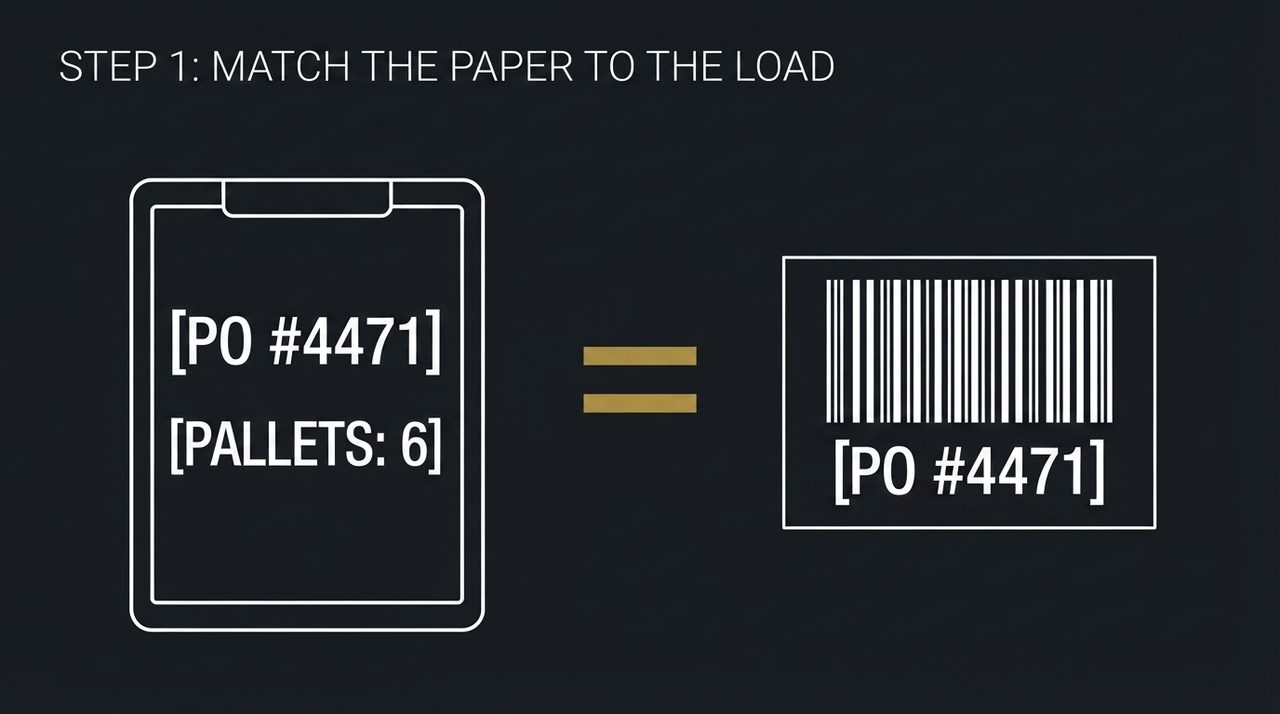
[caption] STEP 1: MATCH THE PAPER TO THE LOAD
[voice] Step one: match the paperwork to the freight before a single box is moved. The PO number and the pallet count must match the manifest exactly.
[drawing] HEADER: Top-center, standard 5% canvas height (identical scale and Y-position to Scene 1), bold uppercase sans-serif: "STEP 1: MATCH THE PAPER TO THE LOAD". SCENE COMPOSITION: High-contrast split-screen comparison below the header. On the left: clean vector delivery manifest with bold typography: [PO #4471] and [PALLETS: 6]. On the right: pallet barcode placard displaying identical text: [PO #4471]. Between both sides, a bold green technical equal sign [ = ] confirming the match. No human figures.

[scene 3 | 0:21]
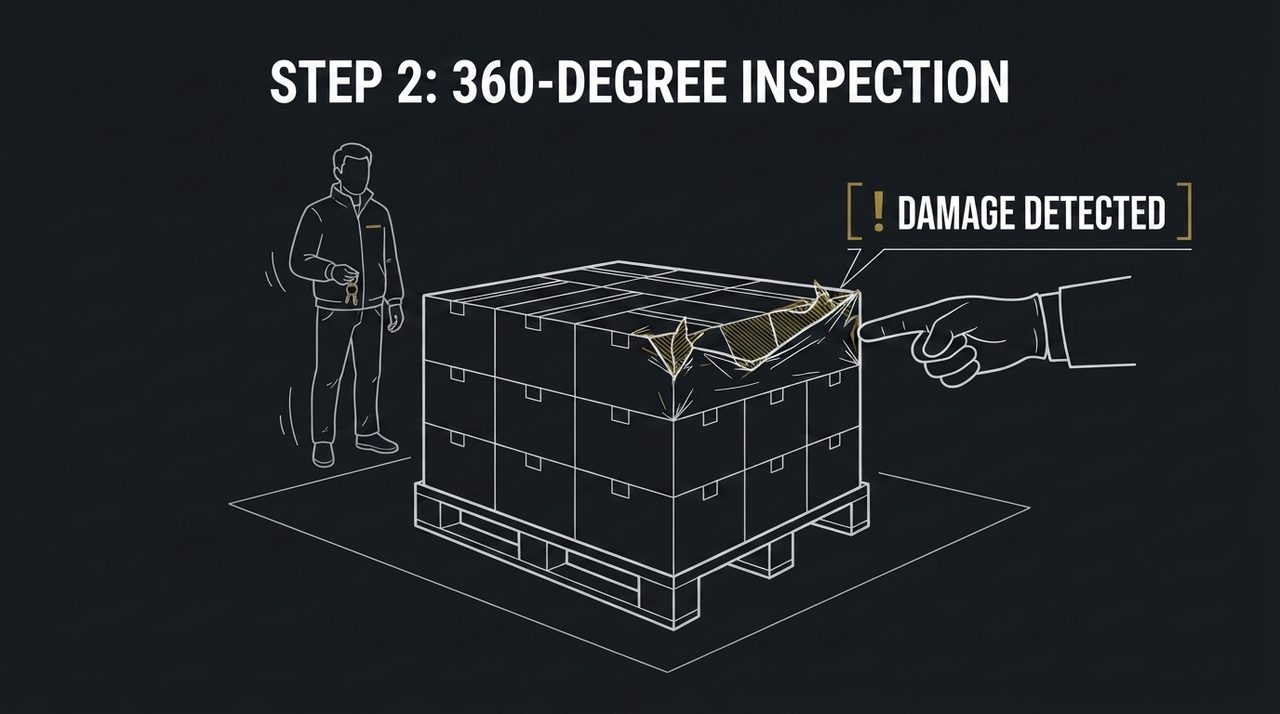
[caption] STEP 2: 360-DEGREE INSPECTION
[voice] Step two: inspect all four sides while the driver waits at the bay. Crushed corners, punctured shrink-wrap, and watermarks are damage.
[drawing] HEADER: Top-center, standard 5% canvas height (identical scale and Y-position to Scene 1), bold uppercase sans-serif: "STEP 2: 360-DEGREE INSPECTION". SCENE COMPOSITION: Three-quarter perspective below the header. Center: Pallet of cartons. Top-right carton has a visibly crushed corner and torn film. Operator's gloved hand points at the damage with an authoritative callout box: [ ! DAMAGE DETECTED ]. Background: Delivery driver in jacket stands holding keys, waiting.

[scene 4 | 0:30]
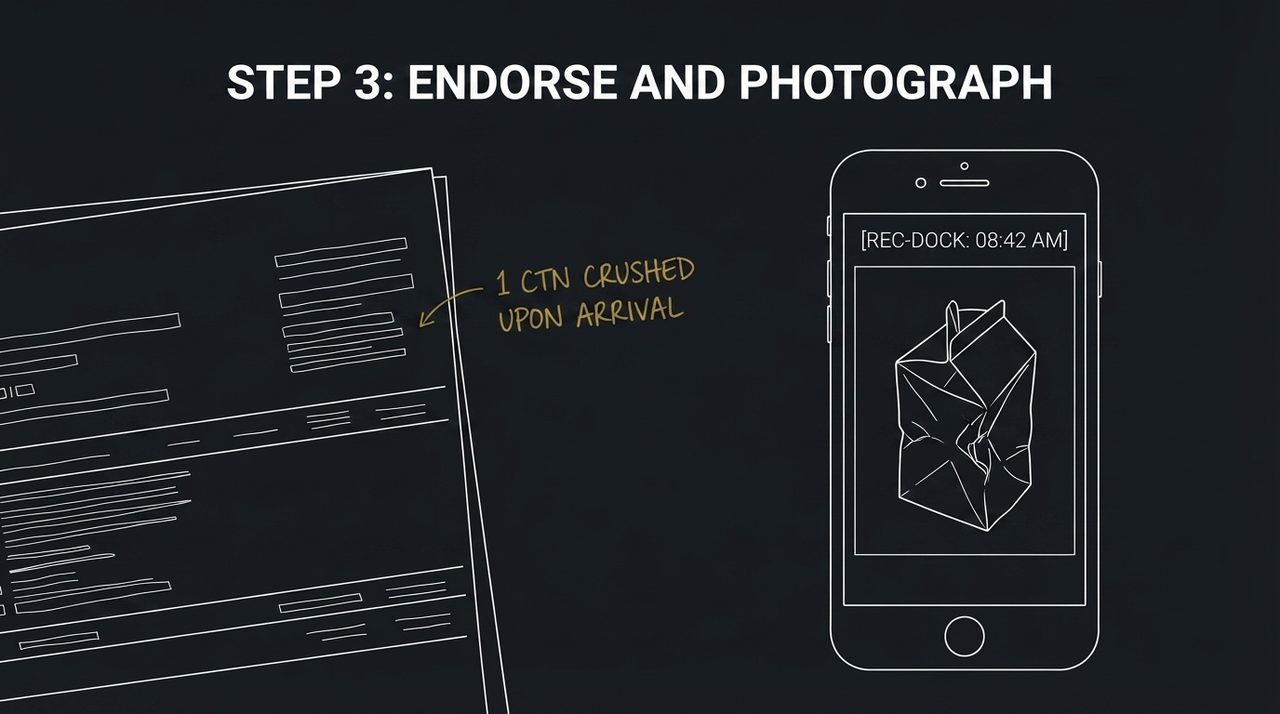
[caption] STEP 3: ENDORSE AND PHOTOGRAPH
[voice] Step three: endorse the physical slip with every exception before signing, then photograph it. Without photographic proof, claims are rejected.
[drawing] HEADER: Top-center, standard 5% canvas height (identical scale and Y-position to Scene 1), bold uppercase sans-serif: "STEP 3: ENDORSE AND PHOTOGRAPH". SCENE COMPOSITION: Macro technical split below the header. On the left: delivery manifest with bold red handwritten notation: "1 CTN CRUSHED UPON ARRIVAL". On the right: upright smartphone displaying a framed photo of the crushed carton, with digital timestamp overlay: [REC-DOCK: 08:42 AM].

[scene 5 | 0:38]
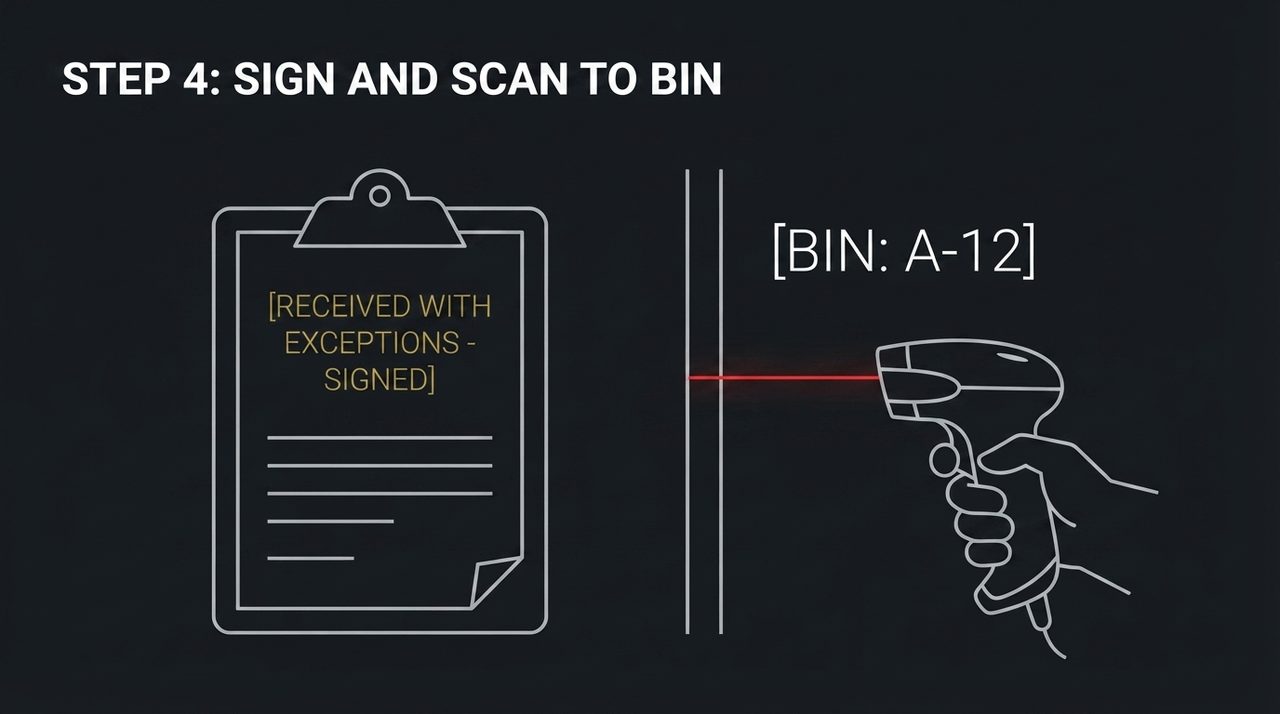
[caption] STEP 4: SIGN AND SCAN TO BIN
[voice] Step four: sign the endorsed manifest, then immediately scan the pallet into its designated bin location. Unscanned freight does not exist.
[drawing] HEADER: Top-center, standard 5% canvas height (identical scale and Y-position to Scene 1), bold uppercase sans-serif: "STEP 4: SIGN AND SCAN TO BIN". SCENE COMPOSITION: Two-part action below the header. Left side: Delivery manifest with official acceptance stamp: [RECEIVED WITH EXCEPTIONS - SIGNED]. Right side: Operator holding barcode scanner, targeting red laser line onto racking label: [BIN: A-12].

[scene 6 | 0:47]
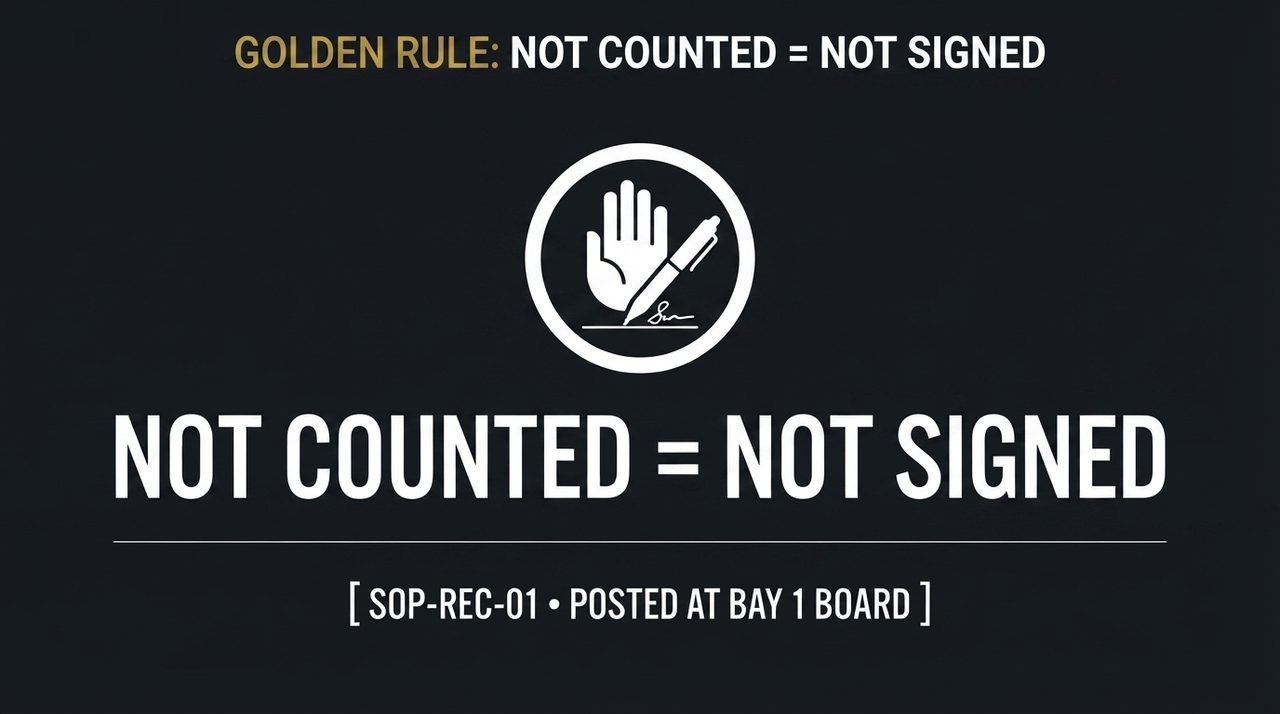
[caption] GOLDEN RULE: NOT COUNTED = NOT SIGNED
[voice] The non-negotiable rule: If you didn't count it, do not sign for it. The complete one-page SOP is posted at Receiving Board 01.
[drawing] HEADER: Top-center, standard 5% canvas height (identical scale and Y-position to Scene 1), bold uppercase sans-serif: "GOLDEN RULE: NOT COUNTED = NOT SIGNED". SCENE COMPOSITION: High-impact safety poster layout below the header. Dead center: bold circular stop icon with a stylized hand halting a pen directly above a signature line. Centered across the middle in massive technical typography: NOT COUNTED = NOT SIGNED. Below it, separated by a clean hairline rule, a minimal document badge: [ SOP-REC-01 - POSTED AT BAY 1 BOARD ].
Step 2. The style is chosen once, and never mentioned in a scene
Nothing in that script says charcoal, white or gold. The look is a separate choice, made once and held for the whole video. It is read from an image of the style, not from a list of options typed into the script.
That is the Executive Briefing style: charcoal ground, white line of even weight, and a single warm accent used only where attention has to go. Every one of the six frames below inherits it without a word of it appearing in the script.
That division is the working method in one line. The script says what happens and what is printed. The style says what it looks like. Neither is allowed to leak into the other, and the one time we let a colour leak, it won: see scene five below.
Step 3. The storyboard that came back
Six frames for six scenes, every caption word for word as written. Nothing was merged and nothing was cut, because no target length was set: with a fixed length in the box, a script that runs long gets shortened and the engine decides what goes.
One thing the job shows that the script does not: by the time a scene reaches the renderer, its drawing brief is one flat paragraph. Line breaks and indentation are gone, which is why a layout written as a block at the top of the script never binds.
Step 4. The video
Six frames, the narration under them, and the drawing paced against the voice. This is the file that came out, and it is the one at the top of every training email that actually gets opened.
What held, and why
Every printed string came out exactly as typed. PO #4471, PALLETS: 6, DAMAGE DETECTED, 1 CTN CRUSHED UPON ARRIVAL, REC-DOCK: 08:42 AM, RECEIVED WITH EXCEPTIONS, BIN: A-12, SOP-REC-01. That is what makes the video usable on a floor monitor with the sound off, and it is the whole reason to write the printed lines yourself instead of describing them.
The recurring objects stayed the same objects. The pallet in scene one is the pallet in scene three. The operator keeps the vest, the gloves and the clipboard. Both were described in the same words each time they appeared, and that is the only thing holding them together.
The last frame works as a poster. Scene six asked for a rule in large type on an empty ground and got one. That is the frame to screenshot and pin to the bay board.
What did not hold, and what to write instead
Typography does not hold across frames, however you ask. Every scene names its header in the same words, down to the height and the position, and look at the frames anyway: the first two headers are light and left aligned, the third and fourth bold and centred, the last one sits higher than the rest. Each frame is drawn on its own, and nothing written in a scene reaches across to the next one. Layout that has to be identical everywhere belongs to the style, not to the script. What the script can hold is the wording, and it did: every header carries exactly the text it was given.
Square brackets were drawn. We wrote [PO #4471] and [BIN: A-12] meaning "this is the printed text", and the brackets came out as part of the label, drawn on the clipboard. Write printed strings bare: PO #4471, not [PO #4471].
One named colour beat the palette. Scene five asked for a "red laser line" and got a red laser line, in a video whose palette is charcoal, white and gold. Colour belongs to the style. Any colour named in a drawing will be honoured whether or not it fits.
The pattern behind all three: a scene is the unit the renderer works in, and it is the only thing it reads. Words inside a scene are honoured almost literally, brackets and colours included, which is why the printed strings came back perfect and the stray red line came back too. Anything that has to be true of the whole video, the palette, the lettering, the layout, belongs to the style, because no scene can speak for the others.
What we would write differently
| In this run | Next time |
|---|---|
| Header size and position spelled out in every scene | Nothing about typography in the scene at all, and a style that carries the header |
| Printed labels wrapped in square brackets | Labels written bare, exactly as they should appear |
| "targeting red laser line onto racking label" | "the scanner beam crosses the racking label", colour left to the style |
| Long compound sentences in [voice] | Two short sentences; read them aloud and split where you run out of breath |
Other things that go wrong, and the fix
- Text too long to render cleanly. Any printed line longer than a few words degrades into texture. Split it or move it into the narration.
- A person changes between scenes. The description drifted. Copy the sentence, do not rewrite it.
- Background clutter. Desks, shelving, windows and forklifts belong in the frame only when the step touches them. End each drawing with what is not there: "No people in this frame. Nothing else in the frame."
- A new rule in the final frame. The last frame repeats the lesson. A seventh step there is a seventh step nobody remembers.
- Renaming things between scenes. If it is PO #4471 in scene one, it is PO #4471 in scene five.
Start with one task, not the manual
Take a single procedure, six steps at most. Write the six spoken lines first, then the six captions, then the printed strings. The drawing descriptions come last and they are the easy part, because by then you know exactly what has to be in the frame.
- What is an SOP, if the procedure itself is still being written
- Training videos and what they are for